
Here are a selection of articles written by Dr M K Vasant, which were published in professional dental journals.
by Dr M K Vasant MBE
MGDS RCS (Eng), MGDS RCS (Edin), FFGDP (UK), FDS RCS (Edin)
In the last issue of The Grapevine, Dr Lumley (Recent developments in root canal preparation) covered various methods to prepare the root canal. His opening sentence was "the aim of the root canal preparation is to debride the pulp space to produce a shape amenable to obturation." He went on to say, "the anatomy of the root canal systems is complex which makes it impossible to clean them in their entirety…" These statements are very valid and it could be argued that as one cannot see the complexity of the root canal system, it makes it unpredictable to decide whether one can or has filled the whole system. Many obturation techniques have been advocated and as in every other aspect of dentistry, there is a learning curve to develop a technique that one would feel comfortable with.
The modified chloroform dip technique has indeed confirmed my suspicion about this unpredictability and following obturation using this technique, I have often "found" canals that I did not know existed.
The old chlorpercha technique was based on softening gutta-percha in chloroform and using the paste thus produced as a sealant. The criticism leveled against this method was the shrinkage caused by evaporation of the chloroform and subsequent lack of seal. This is quite understandable as a fairly large amount of solvent (chloroform) would have been used to achieve this.
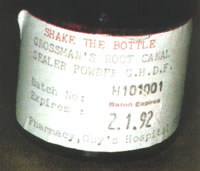
The chloroform (and xylene - which could be used as an alternative) is toxic and could be carcinogenic. However, the author is happy to take shelter under the current premise of "evidence based medicine and practice" and happy to argue about the validity of an in vitro study. Many other solvents have been evaluated for the purpose and the only one that come close to chloroform is rectified turpentine oil. Sadly, I have not been able to source this is in the UK and the suggestion by Martindale that is the same as turpentine in DIY stores gave more ammunition to continue with the devil I know - chloroform! However, I have found that used very judiciously, orange solvent liquid (designed to clean zinc oxide/eugenol-based cements on glass slabs) works well to remove old root fillings in re-treatment. This sounds logical as most root canal sealants are zinc oxide/eugenol-based as is most of the gutta-percha point (65-70% is zinc oxide, waxes and resins). Whilst, I have not been able to confirm this, I am led to believe that the orange solvent available from the dental depots is after all turpine based!
With the techniques described herewith, I use minimal amounts of chloroform and arguably neither the shrinkage nor the carcinogenic risk is applicable.
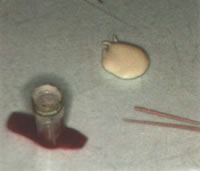
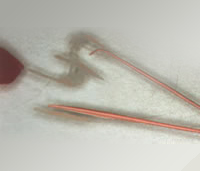
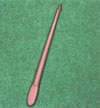
Figures 1, 2, 3 (note how 5 second dip dissolves GP on glass slab)
The canal is prepared using a preferred technique ensuring that there is enough coronal flare so as not to bind GP points or other instruments.
Essentially, the technique consists of selecting a standardized master point that will fit albeit fairly loose in the canal but to the correct length. The canal, having been dried thoroughly, is coated with sealant using a small file or spiral filler if preferred. Secure the master point in the canal to the correct length (confirm radiographically if necessary). This will ensure that the root canal orifice is not too wide open to allow overfilling of the canal during subsequent procedures. The author then prefers to use Mailleffer A25 (thin and flexible spreader) to laterally condense GP points, although a finger spreader will probably do the same job. Note the distinction between a spreader and plugger. The latter has a flat end and is useful for vertical condensation but not particularly good for lateral condensation.
Having done this, a suitable accessory point is dipped in chloroform for 3-10 seconds depending on the surface softening required, and placed in the space created by the spreader. It is important to hold the spreader in place for a while to ensure the space remains patent for some few seconds. Most of the time, the author dips the accessory points upside down so that the tip (about 3mm) does not become soft, and gives a good lead to the rest of point into the canal. The plastic sheath from a dental needle happens to be the right size container (secured to a glass slab with ribbon wax) for this. Alternatively, you may wish to cut the very soft tip off so it does not bend during insertion. The GP thus softened behaves like Thermafill with a hard core of GP and a softer surface-only you have to control how soft you want it to be by varying the time of dip in the chloroform. You can apply vertical pressure as the hard core will enable you to do that at the same time allowing the GP to slide beautifully in place where sometimes due to an inadequate coronal flare you may have held back the GP. Having completed this, the excess GP points are cut off using a hot excavator and vertical pressure applied with a thin amalgam plugger or a root canal plugger to get some vertical additional condensation.
It is important to assure that there is a good coronal seal following obturation of the canal. The author uses Cavit in preference to IRM as it is ready mixed and has been shown to be equally effective in preventing bacterial leakage. Needless to say an intermediate restoration such as amalgam is carried out within the next week or so.
A young child with an open apex was treated, by using a customized accessory GP point to fit snugly into the apical foramen. This was done by dipping the GP point and then inserting into the canal to effectively take an impression of the canal. The protruding tip was subsequently cut off and used as a master point, around which other softened accessory GP points were laterally condensed and cut off with heat, then vertically condensed as explained above.
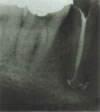
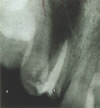
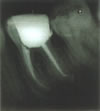
Figures 6 and 7 show premolars filled using the above technique where the author discovered canals that he would have never expected to find. It was suspected that the peculiar system in figure 6 may have been an escape of sealant in the periodontal membrane. This was not the case!
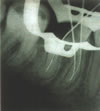
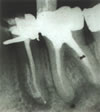
Figures 8 and 9 show how the technique enabled the author to bypass a broken file in the canal with the technique so that the root filling sealed around the broken instrument.
As with any technique, there will be a learning curve!